LED点亮
P2=0xFE;操纵LED的亮灭,后面两个字母是16进制,换为1111 1110
闪烁
完整代码如下
1 2 3 4 5 6 7 8 9 10 11 12 13 14 15 16 17 18 19 20 21 22 23 24 25 26 27 28 29 #include <REGX52.H> #include <INTRINS.H> void Delay500ms () unsigned char i, j, k;4 ;205 ;187 ;do do while (--k);while (--j);while (--i);void main () while (1 )0x55 ;Delay500ms ();0xAA ;Delay500ms ();
直接在stc-isp中找到软件延时计算器直接生成delay即可.<INTRINS.H>头文件,nop函数为空函数,运行时间大约1μ \mu μ
流水灯在while函数内多复制几个即可
延时函数的改进:可以通过形参传入实现更加灵活的delay
1
2
3
4
5
6
7
8
9
10
11
12
13
14
15
void Delay1ms (unsigned int t) unsigned char i, j;while (t)2 ;239 ;do while (--j);while (--i);
按键控制
单独控制一个LED:在REGX52.H头文件中,可以通过P2_X来操控单个灯
数据运算:if(P3_1==0)P2_0~P2_0就已经满足要求了,但是在单片机开发中,往往会加一些防抖代码来防止点一次触发多次,简单的delay是一种思路.
硬件设计时防抖
软件防抖 ```
1 2 3 4 5 6 if (P3_0 =0){while (P3_0 =0);P2_0 =~P2_0;
实现LED二进制递增效果(3-3):
1 2 3 4 5 6 7 8 9 10 11 12 13 14 15 16 17 18 19 20 21 22 23 24 25 26 27 28 29 30 31 32 33 34 #include <REGX52.H> #include <INTRINS.H> void Delay1ms (unsigned int t) unsigned char i, j;while (t)2 ;239 ;do while (--j);while (--i);void main () int num = 0 ;while (1 )if (P3_0 == 0 ) Delay1ms (20 );while (P3_0 == 0 ); Delay1ms (20 );
实现LED移位(3-4):
1 2 3 4 5 6 7 8 9 10 11 12 13 14 15 16 17 18 19 20 21 22 23 24 25 26 27 void main()int num = 0 ;0x01 ;while (1 )if (P3_0 == 0 ) 20 );while (P3_0 == 0 ); 20 );num ++;if (num ==8 )num =0 ;0x01 <<num ); if (P3_1 == 0 ) 20 );while (P3_1 == 0 ); 20 );if (num ==0 )num =7 ;num --;0x01 >>num );
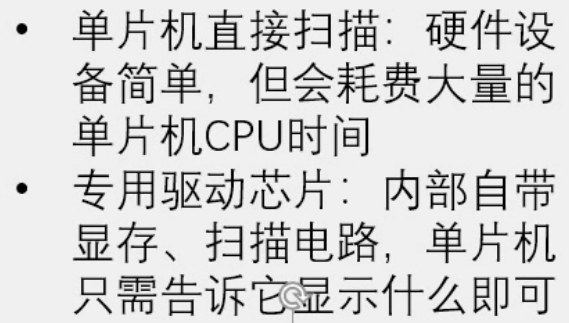
数码管
数码管可以看作是LED的集合
1 2 3 4 5 6 7 8 9 10 11 12 13 14 15 16 17 18 19 20 21 22 23 24 25 26 27 #include <REGX52.H> unsigned char NixieTable[10 ]={0x3F , 0x06 , 0x5B , 0x4F , 0x66 , 0x6D , 0x7D , 0x07 , 0x7F , 0x6F };void Nixie (unsigned char Location, Number) switch (Location)case 1 :P2_4=1 ;P2_3=1 ;P2_2=1 ;break ;case 2 :P2_4=1 ;P2_3=1 ;P2_2=0 ;break ;case 3 :P2_4=1 ;P2_3=0 ;P2_2=1 ;break ;case 4 :P2_4=1 ;P2_3=0 ;P2_2=0 ;break ;case 5 :P2_4=0 ;P2_3=1 ;P2_2=1 ;break ;case 6 :P2_4=0 ;P2_3=1 ;P2_2=0 ;break ;case 7 :P2_4=0 ;P2_3=0 ;P2_2=1 ;break ;case 8 :P2_4=0 ;P2_3=0 ;P2_2=0 ;break ;void main () Nixie (2 ,3 );while (1 )
这行代码实现了在第二个数码管显示为3的功能.NixieTable储存了数码管的输出代码
动态数码管显示(可以显示多个):
1 2 3 4 5 6 7 8 9 void main ()while (1 )Nixie (1 ,1 );Nixie (2 ,2 );Nixie (3 ,3 );
原理是视觉暂留,这样才能同时显示多个数字.Nixie函数改进,可以达到目的.
1 2 3 4 5 6 7 8 9 10 11 12 13 14 15 16 17 void Nixie (unsigned char Location , Number )Location )case 1 :P2_4= 1 ;P2_3 =1 ;P2_2 =1 ;break ;case 2 :P2_4= 1 ;P2_3 =1 ;P2_2 =0 ;break ;case 3 :P2_4= 1 ;P2_3 =0 ;P2_2 =1 ;break ;case 4 :P2_4= 1 ;P2_3 =0 ;P2_2 =0 ;break ;case 5 :P2_4= 0 ;P2_3 =1 ;P2_2 =1 ;break ;case 6 :P2_4= 0 ;P2_3 =1 ;P2_2 =0 ;break ;case 7 :P2_4= 0 ;P2_3 =0 ;P2_2 =1 ;break ;case 8 :P2_4= 0 ;P2_3 =0 ;P2_2 =0 ;break ;P0 =NixieTable [Number ];1 );P0 =0x00 ;
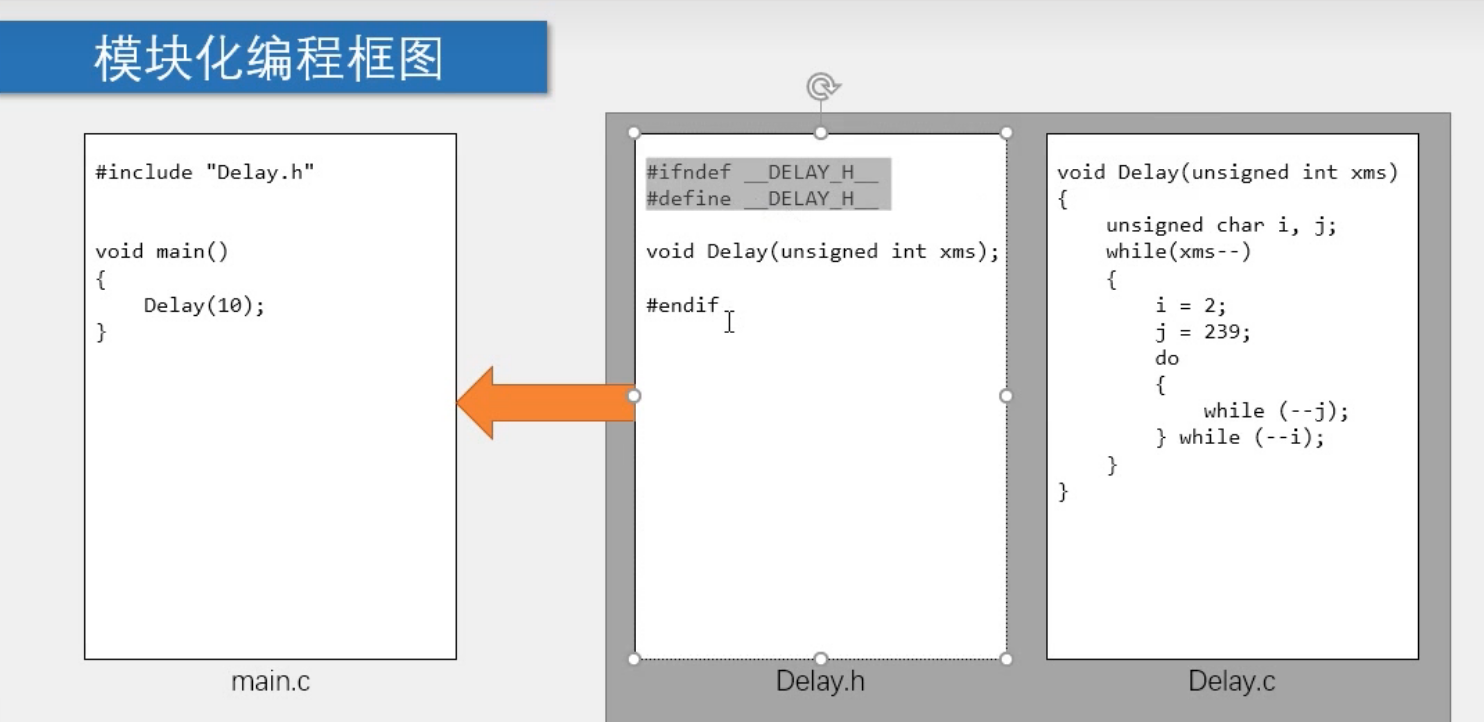
模块化编程
之后如delay()函数等较为常用的函数可以放在文件夹,命名为delay.c,再加入delay.h预编译文件,之后直接在文件中#include <delay.h>即可delay.h:
1 2 3 4 #ifndef _DELAY_H__ #define _DELAY_H__ void delay (unsigned int x) #endif
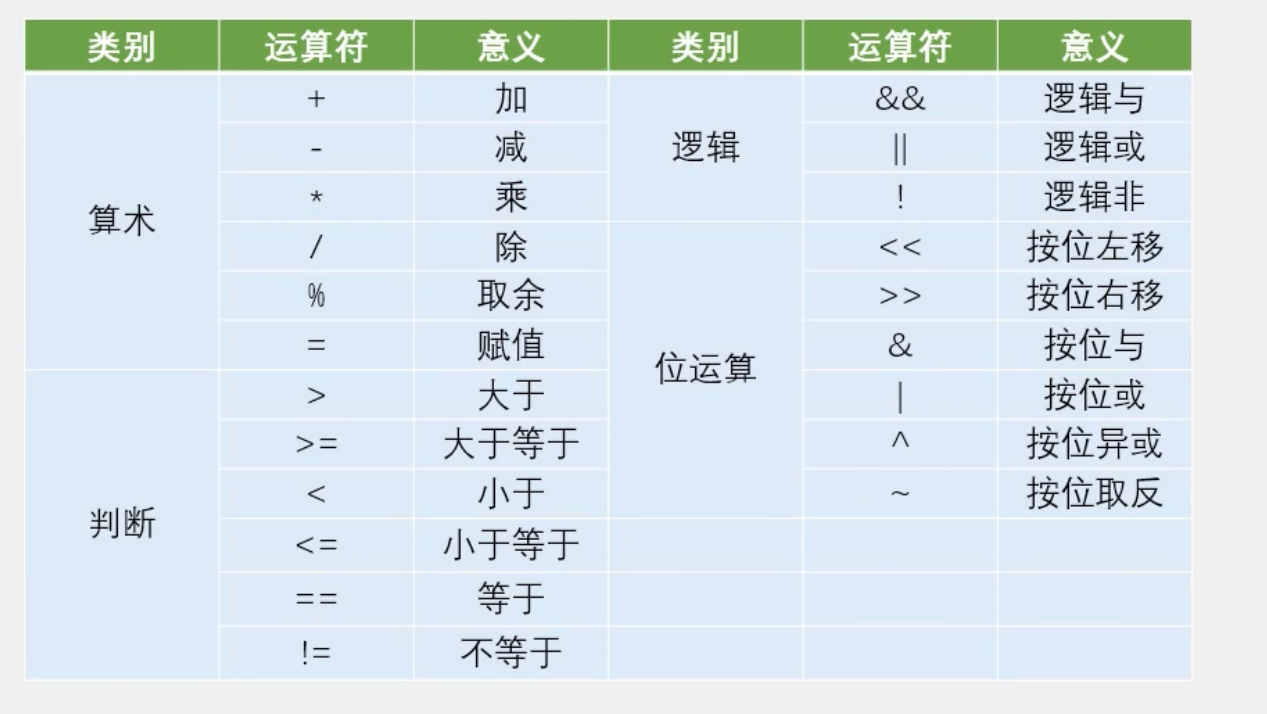
C语言的预编译以 # 开头,作用是在真正的编译开始之前,对代码做一些处理(预编译)
预编译
意义
#include <REGX52.H>把 REGX52.H 文件的内容搬到此处
#define PI 3.14定义 PI,将 PI 替换为 3.14
#define ABC定义 ABC
#ifndef __XX_H__如果没有定义 __XX_H__
#endif与 #ifndef,#ifdef 匹配,组成“括号”
此外还有 #ifdef、#if、#else、#elif、#undef 等
示例:REGX52.H头文件
1 2 3 4 5 6 7 8 9 10 11 12 13 14 15 16 17 18 19 20 21 22 23 24 25 26 27 28 29 30 31 32 33 34 35 36 37 38 39 40 41 42 43 44 45 46 47 48 49 50 51 52 53 54 55 56 57 58 59 60 61 62 63 64 65 66 67 68 69 70 71 72 73 74 75 76 77 78 79 80 81 82 83 84 85 86 87 88 89 90 91 92 93 94 95 96 97 98 99 100 101 102 103 104 105 106 107 108 109 110 111 112 113 114 115 116 117 118 119 120 121 122 123 124 125 126 127 128 129 130 131 132 133 134 135 136 137 138 139 140 141 142 143 144 145 146 147 148 149 150 151 152 153 154 155 156 157 158 159 160 161 162 163 164 165 166 167 168 169 170 171 172 173 174 175 176 177 178 179 180 181 182 183 184 185 186 187 188 189 190 191 192 193 194 195 196 197 198 199 200 201 202 203 204 205 206 207 208 209 210 211 212 213 214 215 216 217 218 219 0x80 ;SP = 0x81 ;0x82 ;0x83 ;0x87 ;0x88 ;0x89 ;0x8A ;0x8B ;0x8C ;0x8D ;0x90 ;SCON = 0x98 ;SBUF = 0x99 ;0xA0 ;0xA8 ;0xB0 ;0xB8 ;0xC8 ;0xC9 ;0xCA ;0xCB ;0xCC ;0xCD ;0xD0 ;0xE0 ;B = 0xF0 ;sbit P0_0 = 0x80 ;sbit P0_1 = 0x81 ;sbit P0_2 = 0x82 ;sbit P0_3 = 0x83 ;sbit P0_4 = 0x84 ;sbit P0_5 = 0x85 ;sbit P0_6 = 0x86 ;sbit P0_7 = 0x87 ;sbit IT0 = 0x88 ;sbit IE0 = 0x89 ;sbit IT1 = 0x8A ;sbit IE1 = 0x8B ;sbit TR0 = 0x8C ;sbit TF0 = 0x8D ;sbit TR1 = 0x8E ;sbit TF1 = 0x8F ;sbit P1_0 = 0x90 ;sbit P1_1 = 0x91 ;sbit P1_2 = 0x92 ;sbit P1_3 = 0x93 ;sbit P1_4 = 0x94 ;sbit P1_5 = 0x95 ;sbit P1_6 = 0x96 ;sbit P1_7 = 0x97 ;sbit T2 = 0x90 sbit T2EX = 0x91 sbit RI = 0x98 ;sbit TI = 0x99 ;sbit RB8 = 0x9A ;sbit TB8 = 0x9B ;sbit REN = 0x9C ;sbit SM2 = 0x9D ;sbit SM1 = 0x9E ;sbit SM0 = 0x9F ;sbit P2_0 = 0xA0 ;sbit P2_1 = 0xA1 ;sbit P2_2 = 0xA2 ;sbit P2_3 = 0xA3 ;sbit P2_4 = 0xA4 ;sbit P2_5 = 0xA5 ;sbit P2_6 = 0xA6 ;sbit P2_7 = 0xA7 ;sbit EX0 = 0xA8 sbit ET0 = 0xA9 sbit EX1 = 0xAA sbit ET1 = 0xAB sbit ES = 0xAC sbit ET2 = 0xAD sbit EA = 0xAF sbit P3_0 = 0xB0 ;sbit P3_1 = 0xB1 ;sbit P3_2 = 0xB2 ;sbit P3_3 = 0xB3 ;sbit P3_4 = 0xB4 ;sbit P3_5 = 0xB5 ;sbit P3_6 = 0xB6 ;sbit P3_7 = 0xB7 ;sbit RXD = 0xB0 sbit TXD = 0xB1 sbit INT0 = 0xB2 sbit INT1 = 0xB3 sbit T0 = 0xB4 sbit T1 = 0xB5 sbit WR = 0xB6 sbit RD = 0xB7 sbit PX0 = 0xB8 ;sbit PT0 = 0xB9 ;sbit PX1 = 0xBA ;sbit PT1 = 0xBB ;sbit PS = 0xBC ;sbit PT2 = 0xBD ;sbit CP_RL2= 0xC8 sbit C_T2 = 0xC9 sbit TR2 = 0xCA sbit EXEN2= 0xCB sbit TCLK = 0xCC sbit RCLK = 0xCD sbit EXF2 = 0xCE sbit TF2 = 0xCF sbit P = 0xD0 ;sbit F1 = 0xD1 ;sbit OV = 0xD2 ;sbit RS0 = 0xD3 ;sbit RS1 = 0xD4 ;sbit F0 = 0xD5 ;sbit AC = 0xD6 ;sbit CY = 0xD7 ;
LCD1602
LCD1602是单片机的液晶屏,用于在单片机上的液晶屏上的调试,在Keil 5加入LCD1602的.c和.h文件后,打头文件即可使用里面的函数,具体说明在.c文件中.注意头文件是自己加的时用冒号代替<>.
函数
意义
LCD_Init();
初始化
LCD_ShowChar(1,1,‘A’);
显示一个字符
LCD_ShowString(1,3,“Hello”);
显示字符串
LCD_ShowNum(1,9,123,3);
显示十进制数字
LCD_ShowSignedNum(1,13,-66,2);
显示有符号十进制数字
LCD_ShowHexNum(2,1,0xA8,2);
显示十六进制数字
LCD_ShowBinNum(2,4,0xAA,8);
显示二进制数字
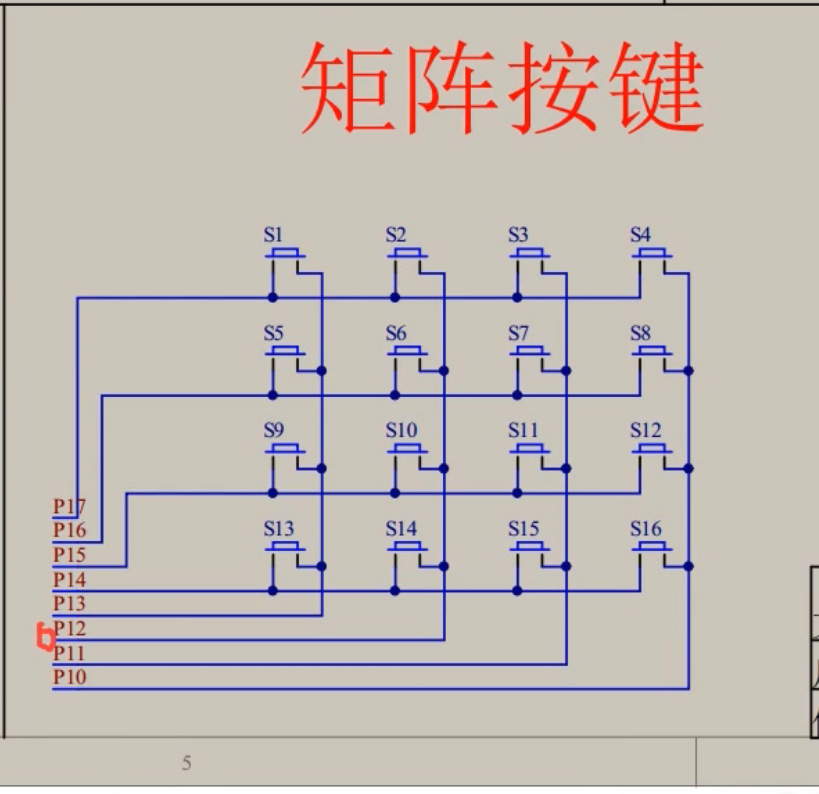
键盘扫描
51单片机的矩阵键盘如图所示
实现显示按键数的功能
1 2 3 4 5 6 7 8 9 10 11 12 13 14 15 16 17 18 19 20 21 22 23 24 25 26 27 28 29 30 31 32 33 34 35 36 37 38 39 40 41 42 43 44 45 46 47 48 49 50 51 52 53 54 55 56 57 58 59 60 while (xms--)do while (--j);while (--i);KeyNumber =0;P1 =0xFF;P1_3 =0;if (P1_7 ==0){Delay(20);while (P1_7 ==0);Delay(20);KeyNumber=1;}if (P1_6 ==0){Delay(20);while (P1_6 ==0);Delay(20);KeyNumber=5;}if (P1_5 ==0){Delay(20);while (P1_5 ==0);Delay(20);KeyNumber=9;}if (P1_4 ==0){Delay(20);while (P1_4 ==0);Delay(20);KeyNumber=13;}P1 =0xFF;P1_2 =0;if (P1_7 ==0){Delay(20);while (P1_7 ==0);Delay(20);KeyNumber=2;}if (P1_6 ==0){Delay(20);while (P1_6 ==0);Delay(20);KeyNumber=6;}if (P1_5 ==0){Delay(20);while (P1_5 ==0);Delay(20);KeyNumber=10;}if (P1_4 ==0){Delay(20);while (P1_4 ==0);Delay(20);KeyNumber=14;}P1 =0xFF;P1_1 =0;if (P1_7 ==0){Delay(20);while (P1_7 ==0);Delay(20);KeyNumber=3;}if (P1_6 ==0){Delay(20);while (P1_6 ==0);Delay(20);KeyNumber=7;}if (P1_5 ==0){Delay(20);while (P1_5 ==0);Delay(20);KeyNumber=11;}if (P1_4 ==0){Delay(20);while (P1_4 ==0);Delay(20);KeyNumber=15;}P1 =0xFF;P1_0 =0;if (P1_7 ==0){Delay(20);while (P1_7 ==0);Delay(20);KeyNumber=4;}if (P1_6 ==0){Delay(20);while (P1_6 ==0);Delay(20);KeyNumber=8;}if (P1_5 ==0){Delay(20);while (P1_5 ==0);Delay(20);KeyNumber=12;}if (P1_4 ==0){Delay(20);while (P1_4 ==0);Delay(20);KeyNumber=16;}"Key:" );while (1)key =MatrixKey();if (key)LCD_ShowNum(2,1,key,2);
其中原理是键盘扫描,首先,将P1口设置为全高电平 (0xFF),然后将P1_3(对应第一列)设为低电平(0),以激活这一列。然后检查对应行的引脚(P1_7, P1_6, P1_5, P1_4),如果某一列的引脚为低电平,则表示该列上的按键被按下,记录按键编号为1、5、9、13。
1 2 3 4 5 6 7 8 9 10 11 12 13 14 15 16 17 18 19 20 void main()1 ,1 ,"Key:" );sum =0 ,key =0 ,time =1 ;while (time <=4 )key =MatrixKey();if (!key )continue;if (key <10 ){sum =sum *10 +key ;LCD_ShowNum(2 ,1 ,sum ,6 );time ++;}else if (key ==10 ){sum *=10 ;LCD_ShowNum(2 ,1 ,sum ,6 );time ++;}else if (key ==11 ){sum /=10 ;LCD_ShowNum(2 ,1 ,sum ,6 );time --;}key =0 ;while (key -16 )key =MatrixKey();if (sum ==4587 )LCD_ShowString(2 ,1 ,"Right" );else LCD_ShowString(2 ,1 ,"Wrong" );while (1 ){}
这个代码实现了输入4位数字后不再变化,而且按下四行四列按键时显示结果.
总结:学习这一课,说明了单片机开发本质为代码给单片机发指令,比如检测时就通过设置高低电平来判断时哪个数字,key=MatrixKey();这行代码在循环体内运行时会返回大量的0,直至不返回0时才有下一步的操作.
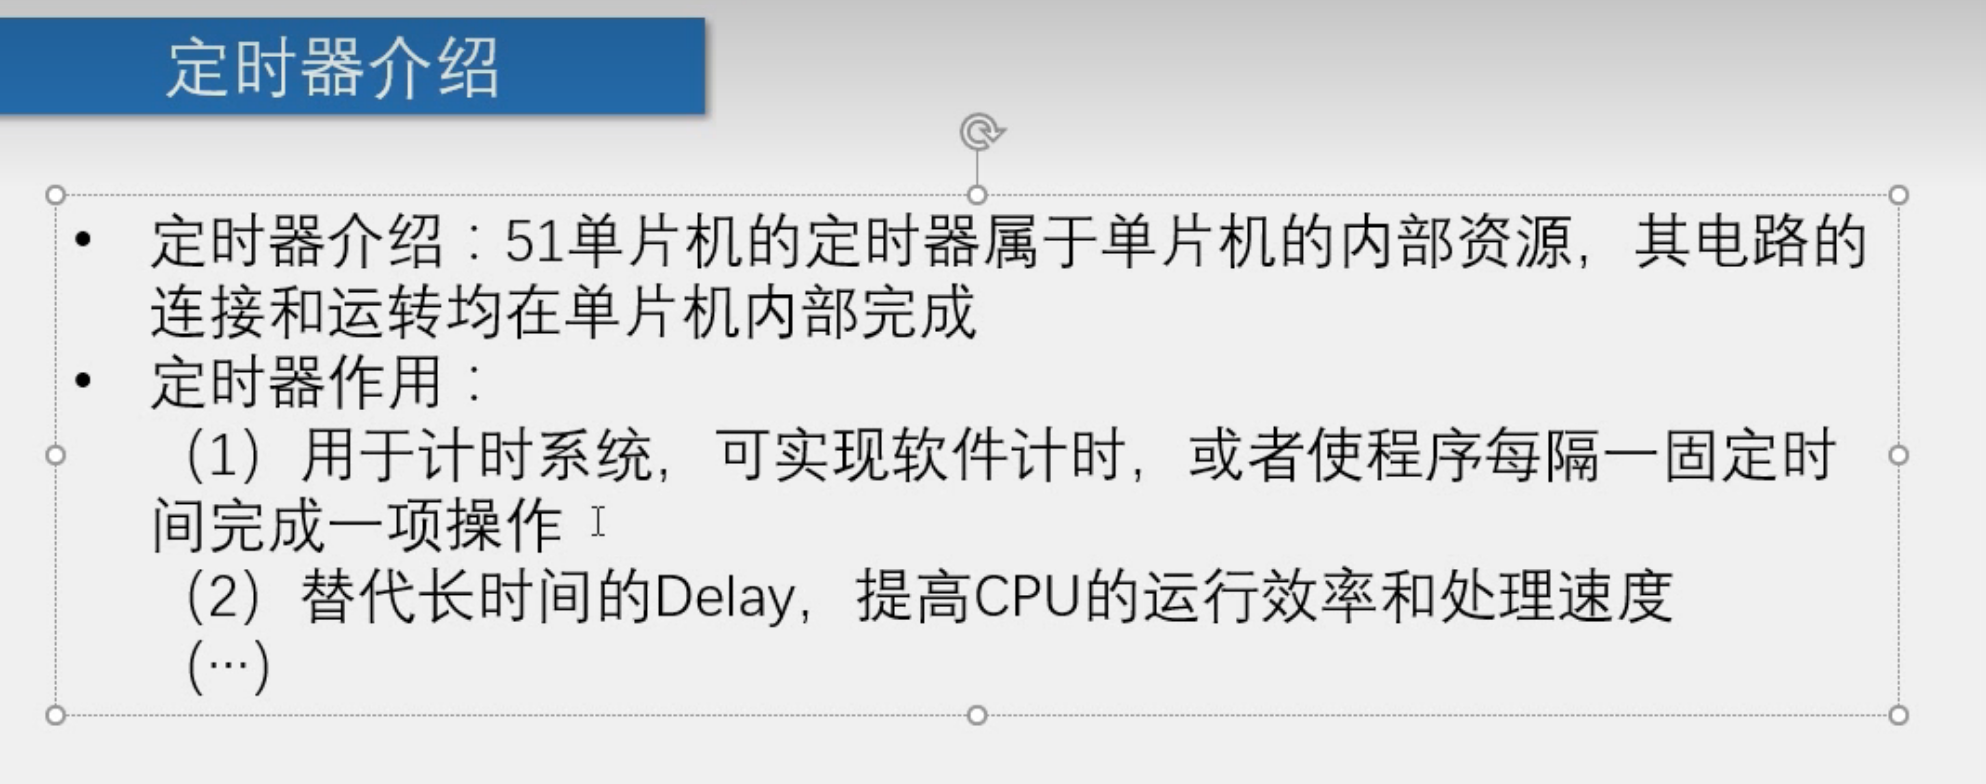
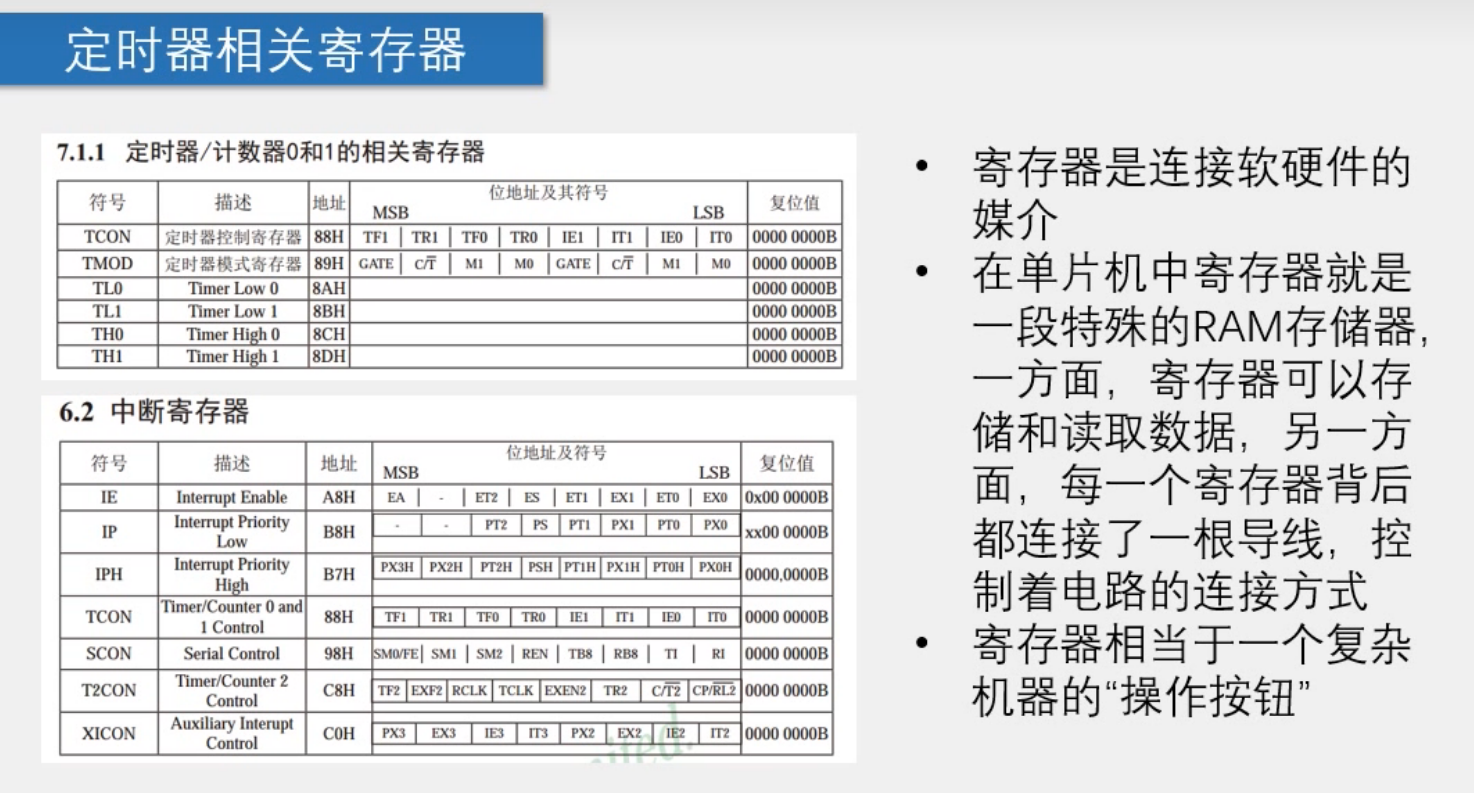
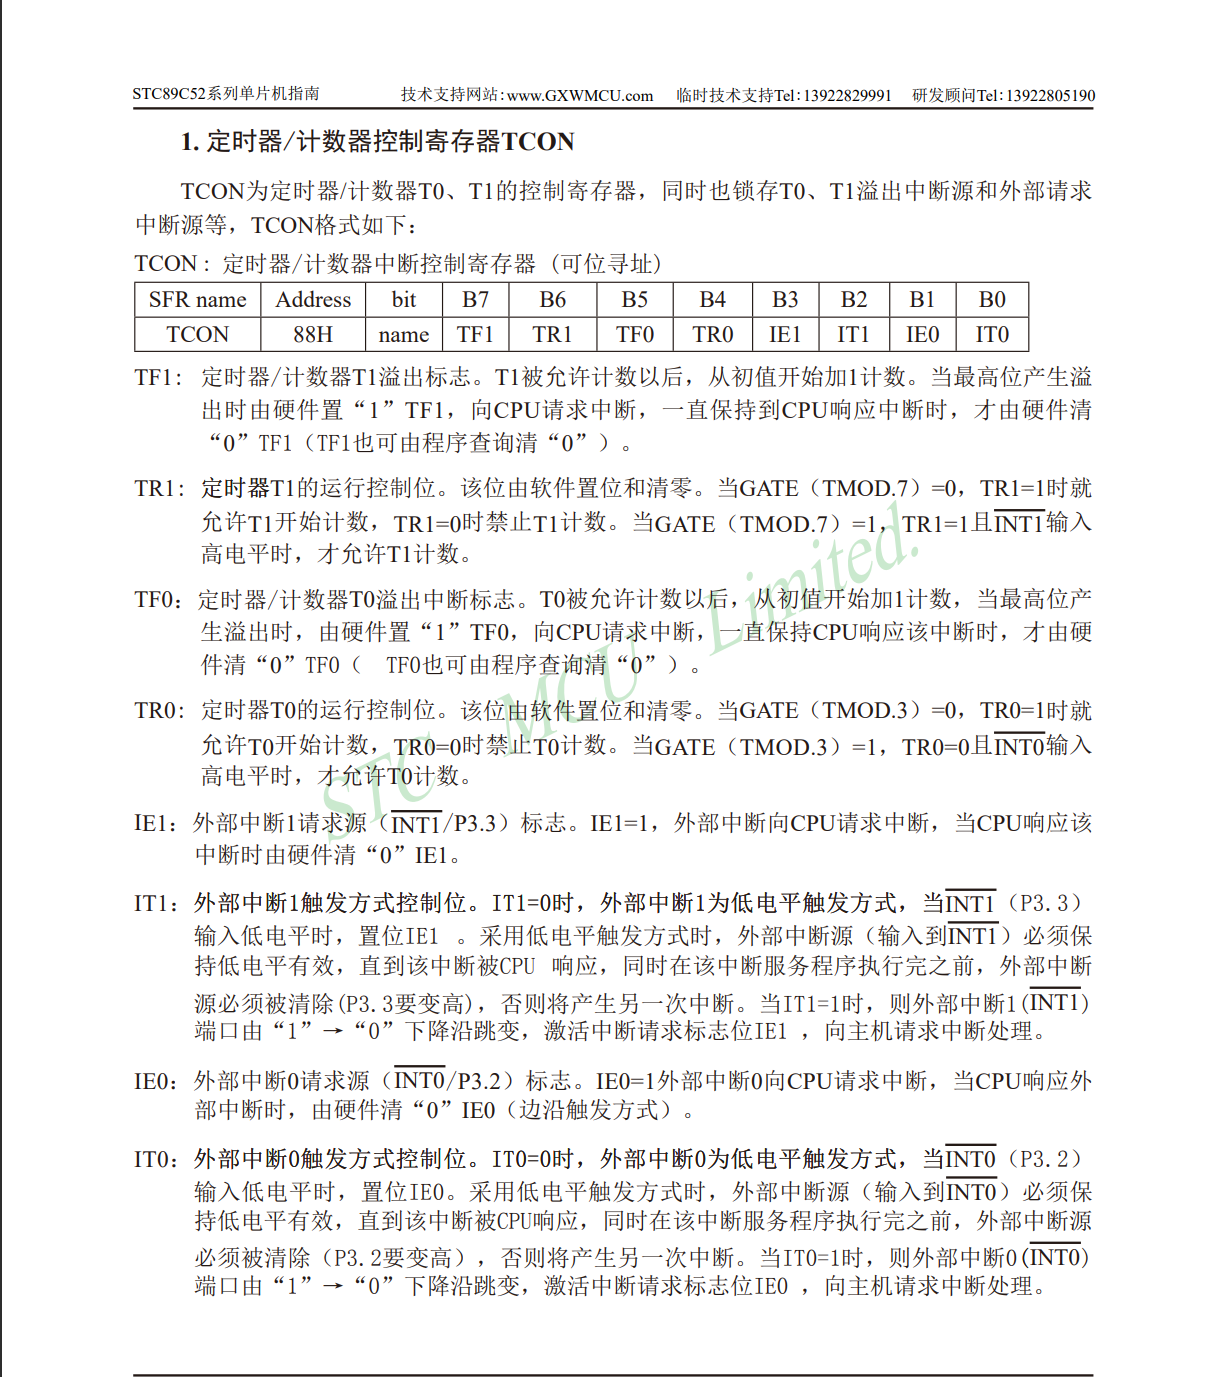
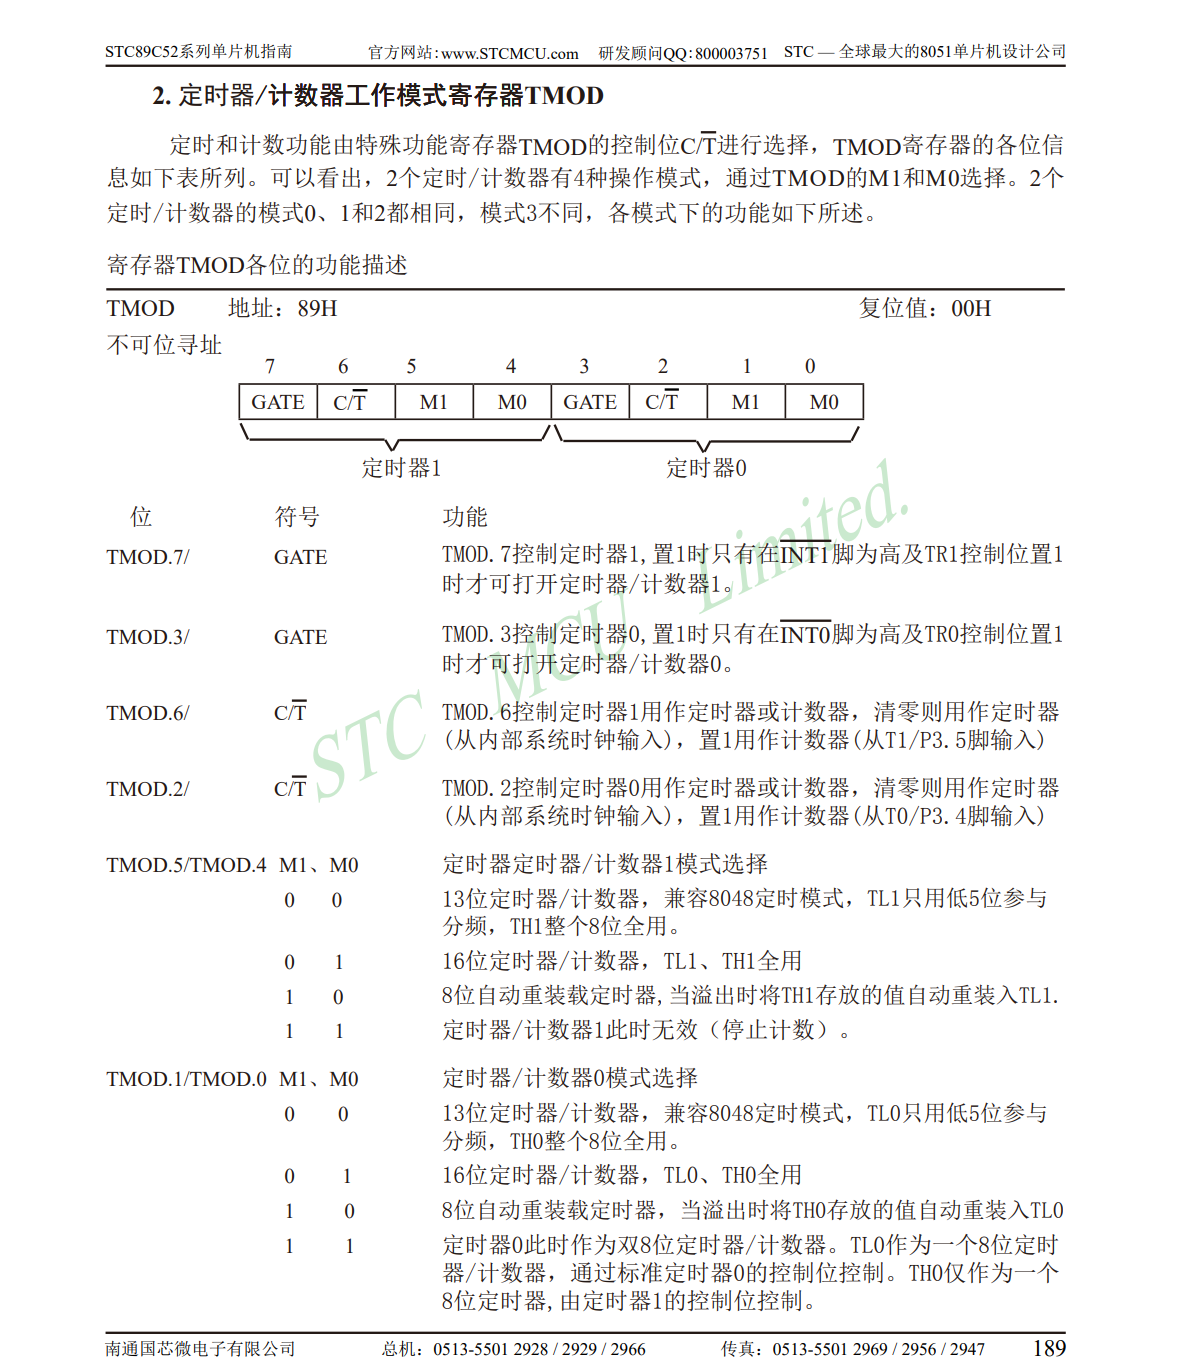
定时器
在制作LED流水灯时,我们使用的是delay函数,这其实是一种很笨的方法,而且使得按键变得不灵敏,这一节我们会通过定时器实现这个效果.
1 2 3 4 5 6 7 8 9 10 11 12 void timer0_init()= 0 x01= 0 = 1 = 0 xFF= 0 xFF= 1 = 1 = 0
![[Pasted image 20240821071854.png]]
1 2 3 4 5 6 7 8 9 10 11 12 unsigned int time =0 ;void timer_interrupt() interrupt 1 0 xFF;0 xFF;time ++;if (time >=1000 )time =0 ;
发现2号灯亮了,说明计时中断了,下面写一个程序实现1ms计时一次而不是1us,并改进TMOD赋值后面四位时为0001的功能:
1 2 3 4 5 6 7 8 9 10 11 12 13 void timer0_init ()0xF0 ; 0x01 ;0 ; 1 ; 0x18 ; 0xFC ; 1 ; 1 ; 0 ;
在中断函数中定义time可以是static unsigned time=0;
1 2 3 4 5 6 7 8 9 10 11 12 13 14 15 16 17 18 19 20 21 22 23 24 25 26 27 28 29 30 31 32 33 34 35 36 37 38 39 40 41 42 43 44 45 46 47 48 49 50 51 52 53 54 55 56 57 58 59 60 61 62 63 64 65 66 67 68 69 70 #include <REGX52.H> #include <INTRINS.H> #include "LCD1602.h" unsigned int sum,key,time;unsigned int keynum,ledmode=1 ;void Delay (unsigned int xms) unsigned char i, j;while (xms--)2 ;239 ;do while (--j);while (--i);void timer0_init () 0xF0 ; 0x01 ;0 ; 1 ; 0xFC ; 0x18 ;1 ; 1 ; 0 ; void timer_interrupt () interrupt 1static unsigned int time=0 ;0xFC ;0x18 ;if (time>=500 )0 ;if (ledmode==1 )P2=_crol_(P2,1 );if (ledmode==0 )P2=_cror_(P2,1 );unsigned char Keyboard () unsigned char KeyNumber=0 ;if (P3_1 == 0 ) { Delay (20 ); while (P3_1 == 0 ); Delay (20 ); KeyNumber = 1 ; }if (P3_0 == 0 ) { Delay (20 ); while (P3_0 == 0 ); Delay (20 ); KeyNumber = 2 ; }if (P3_2 == 0 ) { Delay (20 ); while (P3_2 == 0 ); Delay (20 ); KeyNumber = 3 ; }if (P3_3 == 0 ) { Delay (20 ); while (P3_3 == 0 ); Delay (20 ); KeyNumber = 4 ; }return KeyNumber;void main () 0xF7 ;timer0_init ();while (1 )Keyboard ();if (keynum)if (keynum==1 )ledmode=0 ;else if (keynum==2 )ledmode=1 ;